A growing number of home improvement enthusiasts have discovered a clever, invisible helper for their yards. By simply laying down ready-to-use bags of concrete, adding water, and letting nature take its course, you can create solid, stone-like barriers that keep loose gravel exactly where it belongs.
Why Real-World Driveways Seldom Look Like Social Media
Scroll through any landscaping feed, and you will spot pristine driveways boasting razor-sharp borders, often finished with premium pavers or massive stones. However, the reality outside most homes is quite different. Day by day, loose stones slowly migrate into the surrounding grass. Every sweep of a broom or blast from a leaf blower pushes that gravel further into your lawn.
That messy transition zone is actually highly noticeable. The border between your yard and the pavement is often the first detail guests observe. Establishing a well-defined perimeter offers several distinct advantages:
- Locks loose materials in place, whether you use crushed stone, pea gravel, or standard grit.
- Blocks aggressive weeds and turf from creeping into your parking area.
- Instantly structures your front yard, giving it a manicured appearance.
- Minimizes soil erosion during heavy downpours.
Historically, solving this issue required installing concrete curbs or decorative brickwork. While incredibly durable, those traditional methods demand a much larger budget, specialized tools like a plate compactor, a perfectly leveled sand bed, and often a professional contractor. The bagged concrete strategy bypasses all that complexity.
The Secret: Transforming Simple Bags Into Instant Curbing
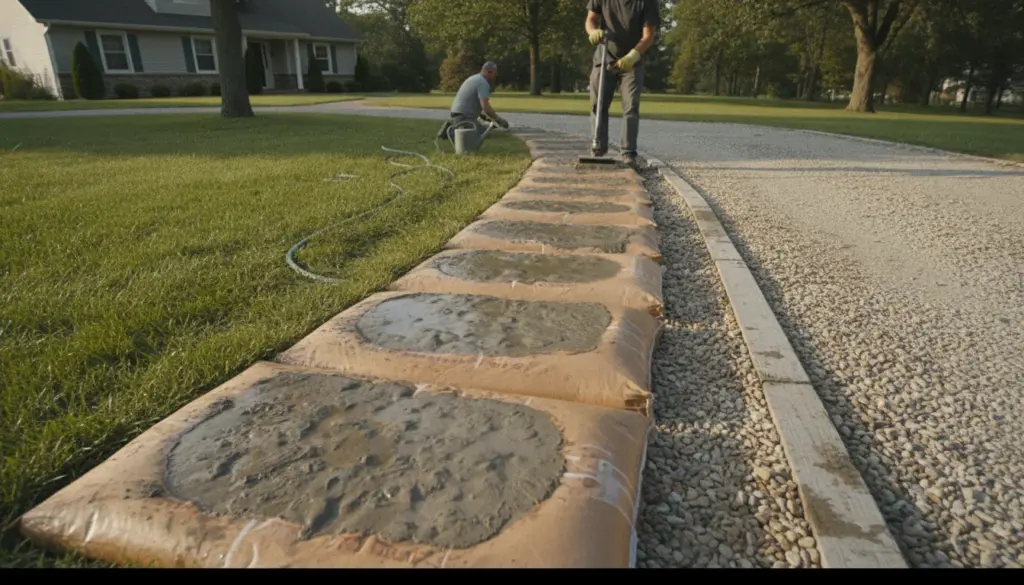
This ingenious technique relies on standard sacks of pre-mixed concrete—the exact kind stacked at every local hardware store—acting as your foundational building blocks. You simply arrange the unopened bags along your desired border, soak them thoroughly, and allow the mixture to solidify right inside its packaging.
Once fully cured, this row transforms into a continuous, heavy-duty edge that resembles large, organic boulders. Best of all, you completely avoid the hassle of mixing tubs of messy mortar or building complicated wooden formwork.
The practical benefits of this method are hard to ignore:
- Extremely beginner-friendly: Zero measuring, zero complex ratios, and no carpentry skills required. Just place and water.
- Highly cost-effective: A standard bag weighing around 22.5 kilograms generally sets you back roughly 4 to 8 euros.
- Rapid execution: You can effortlessly lay out an entire boundary line over a single weekend, leaving the concrete to cure quietly on its own.
- Ultimate flexibility: If a particular block looks out of place, you can simply dig it up and reposition it before it fully sets.
Selecting the Proper Materials Is Crucial
This landscaping hack only succeeds if you purchase the correct supplies. Grabbing just any gray powder from the home improvement aisle will likely lead to disaster. Keep these vital guidelines in mind when shopping.
Opt for Pre-Mixed Concrete, Never Pure Cement
Always purchase concrete mix that already contains the necessary sand and aggregate gravel. If you mistakenly buy pure cement, the resulting blocks will be incredibly brittle and virtually guaranteed to crack under pressure.
Inspect the Bag’s Packaging Carefully
The exterior wrapper must be constructed entirely out of biodegradable paper, completely free of any interior plastic lining or waterproof coating. Standard paper will naturally decompose and rot away over time, beautifully exposing the hardened stone beneath. A plastic barrier will ruin the process by preventing essential water from soaking in and stopping the outer shell from breaking down.
Essential Gear to Gather Before You Start
- A standard garden hose equipped with a gentle spray nozzle
- Heavy-duty work gloves and protective safety glasses
- A long string line or cord to ensure a perfectly straight layout
- A sturdy shovel or spade for trenching
- A basic wooden plank or a rubber mallet to help level the blocks
Preparation: Crafting a Stable Foundation
A flawless driveway border always begins beneath the surface. If you merely toss heavy bags onto loose topsoil, you will inevitably face sinking issues or crooked blocks after a few harsh winters.
Creating a properly compacted, well-draining base trench is mandatory. This critical step ensures that excess water won’t pool underneath your new curbing, which is the primary cause of shifting and future stress fractures.
Step-by-Step Execution: From Paper Sack to Solid Stone
Once your base trench is prepped and leveled, the real fun begins. The exact way you handle and position the packaging dictates the final aesthetic of your new edging.
1. Positioning the Bags Perfectly
Drop each sack into your prepared trench, ensuring the widest flat side faces upward. A clever trick from seasoned DIYers: check which side of the bag was sitting at the bottom of the store’s pallet, and flip that specific side face up. The finer sand particles tend to settle at the bottom during transport, which yields a much smoother texture once cured.
Push the ends tightly against one another to minimize gaps. Frequently check your string line or use a long straightedge to confirm everything is perfectly aligned. If your driveway curves, simply angle the sacks slightly; they will easily adapt to gentle sweeping arcs as long as you maintain a tight fit.
2. Puncturing for Proper Hydration
Grab a standard utility knife or a screwdriver and punch a few small holes into the top of every package. These tiny openings allow the water to penetrate deep into the dense core of the mixture. Keep it moderate—three to five quick punctures per sack are more than sufficient.
3. Soaking the Line Gently
Adjust your hose nozzle to deliver a very soft, rain-like shower. Patiently mist each block until the outer paper turns dark and looks entirely saturated. Never use a high-pressure jet, as this will aggressively wash the dry powder right out of the puncture holes.
Immediately after thoroughly soaking them, you can gently press down on the tops using your foot or a flat wooden board. This light tamping action levels out the heights across the whole row and beautifully rounds off the harsh, square edges of the packaging.
4. The Curing and Aging Process
Under normal weather conditions, the makeshift stones will be solid enough to endure light garden work or casual foot traffic within 24 hours. However, concrete requires roughly 28 days to reach its maximum structural integrity. During this critical curing month, absolutely avoid resting heavy vehicle tires on the edge or bumping it with heavy landscaping machinery.
Over the following weeks, natural sunlight and rainfall will cause the wet paper casing to disintegrate and peel away. If you lack the patience to wait for nature, you can carefully blast the remaining paper remnants off with a pressure washer once the curing phase is totally complete.
Refining Your New Edging and Understanding Its Limits
Once rock solid, you are left with an incredibly durable barrier. With just a touch of extra effort, you can elevate its appearance even further to match your home’s aesthetic.
Creative Finishing Touches
- Apply specialized masonry stain or paint: Easily transform the dull, light gray tones to perfectly complement your home’s exterior siding, existing paving, or overall landscape color palette.
- Conceal with mulch or ornamental gravel: Spreading decorative bark right up against the outside edge softens the harsh visual transition and helps the bulky concrete blend naturally into your garden beds.
- Integrate creeping plants: If you designed a gently curving border, tucking low-growing groundcover plants into strategic spots will make the solid barrier look wonderfully organic and established.
Expert Tips for Long-Lasting Durability and Safety
If you have pets roaming the yard or small children running around, sharp concrete edges are an obvious hazard. While you are initially tamping the wet bags down, consciously try to round the corners. Alternatively, once fully dried, gently grind away any sharp points using a masonry rubbing stone or an angle grinder. This simple step prevents nasty scrapes during inevitable trips and falls.
For homeowners living in regions prone to severe freezing, managing ground moisture is critical. Installing a thin drainage layer of crushed gravel directly beneath the bags significantly reduces the risk of frost heave pushing your border out of alignment. Additionally, traditional winter road salt can slowly degrade concrete surfaces over the years, so switching to sand or salt-free de-icing alternatives will extend the life of your project.
When tackling incredibly long driveways, take a moment to calculate the sheer weight you are adding to your yard’s perimeter. A single row containing fifteen heavy sacks rapidly adds up to several hundred kilos. If your underlying soil consists of soft, spongy peat or recently dumped loose earth, sections of your border might sink over time, requiring frustrating repairs.
Finally, this ingenious, low-cost strategy extends far beyond just driveways. You can utilize the exact same technique to neatly frame a gravel garden path, define a dedicated parking pad, or create robust borders around elevated flower beds. As long as you prioritize ground stability, proper drainage, and gentle hydration, you can introduce incredible structural definition to your property on a remarkably small budget.