Tired of staring at uninspiring, exposed masonry that looks sloppy and acts like a sponge for moisture? You can actually upgrade those rough surfaces into a sophisticated, natural-looking rock finish. All it takes is standard mortar and an inexpensive texturing roller. This technique doesn’t just instantly boost the visual appeal of your interior or facade. It also establishes a highly durable protective barrier against harsh rainfall and intense sunlight, potentially keeping thousands of dollars in your pocket compared to buying authentic stone cladding.
How Mortar Fundamentally Changes Your Raw Masonry
The entire transformation begins with applying the right foundation directly onto the exposed block. Your initial coat serves a crucial purpose: completely masking the underlying brickwork while sealing off a surface that typically suffers heavy moisture damage. From a professional standpoint, this is far more than a cosmetic upgrade. The base material acts as an impenetrable shield against aggressive weather conditions.
Following the primer coat, you will reinforce the structure by applying a second pass. For optimal results, you need to maintain a thickness of roughly 3 to 4 millimeters. Hitting this exact measurement ensures the material remains pliable enough for texturing without putting unnecessary weight strain on your structure. Ultimately, this step levels out the working area and sets the perfect canvas for your custom design.
Where the Textured Rock Illusion Actually Begins
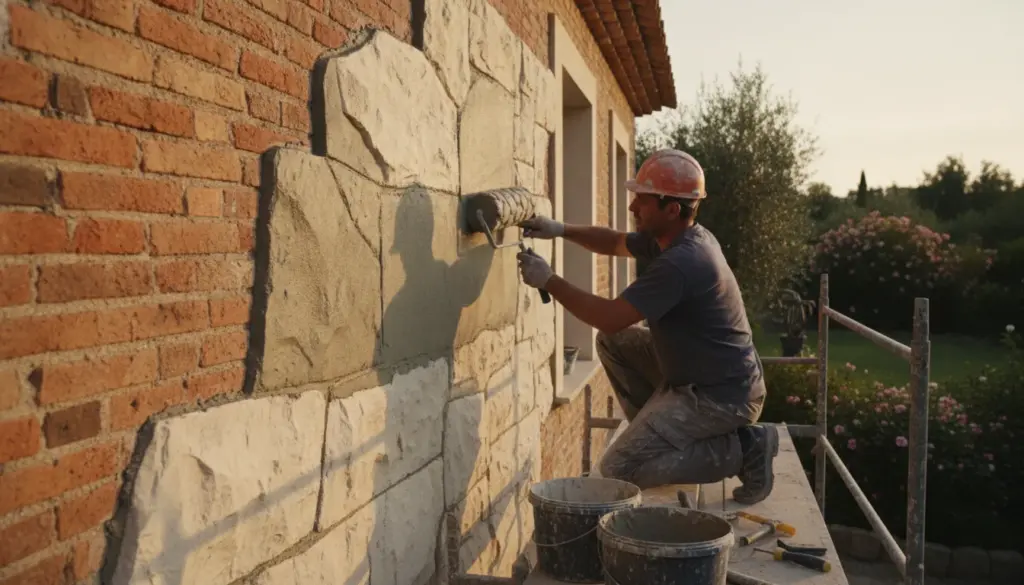
The true visual magic doesn’t occur during the curing phase. Instead, it happens the exact moment your pattern roller glides over the fresh, damp compound. Grasping this timing is what separates a successful project from a messy DIY attempt. Rolling the tool in vertical motions generates distinct, organic irregularities, elevating the finish from standard flat plaster to a convincing natural rock facade.
Expert tip: To achieve the most authentic-looking mortar joints, grab a piece of bent wire or a discarded metal nut to carve your structural lines. You want to do this right as the material begins to stiffen, yet remains somewhat moldable.
Once your overall texture is set, it is time to map out the individual blocks. You can use almost any basic hand tool for this step, provided you firmly carve out the separations before the wall completely dries. At this stage, your flat barrier evolves into a professional-grade decorative arrangement featuring defined stone shapes and authentic-looking grout lines.
Why Selecting AC2 Grade Compound Makes All the Difference
Reaching for an AC2-rated mortar is a deliberate, calculated choice. Whenever a facade faces direct, continuous exposure to harsh sun rays and heavy downpours, utilizing a mix engineered for advanced weather resistance is non-negotiable. In high-exposure projects like this, structural longevity isn’t just a bonus—it is the absolute primary objective.
Even after the wall has fully cured, dedicating a few moments to refining the details pays off. Use a standard trowel to gently knock off any sharp burrs or dried clumps, ensuring the final relief looks clean and sharp. Furthermore, your exterior paint selection must match the high quality of your base compound. There is no point in crafting a brilliant, realistic texture if your topcoat finish cannot survive the test of time and shifting seasons.
How Careful Coloring Builds Depth Without Hiding Your Texture
The staining process kicks off with a yellow base coat, acting as the foundational primer for all subsequent shades. This initial layer does much more than simply cover the gray cement; it injects essential visual warmth, ensuring the finished masonry doesn’t appear flat or lifeless. Once this primer fully coats the carved relief, every single ridge and crevice starts to react differently to ambient light, brilliantly highlighting your carving work.
Next, selectively apply darker accents to distinct blocks across the wall. You definitely shouldn’t paint every single section identically! This deliberate alternation between luminous and shadowed tones prevents the installation from looking manufactured or artificial. By introducing varied color dynamics, specific spots will visually recede to create a deeply authentic, eye-catching aesthetic.
The Final Touch That Defines Your Decorative Finish
Your concluding step involves blending a water-based acrylic resin with brown and orange pigments to formulate a rich mahogany hue. There is no strict, mathematical formula here. Simply introduce the colorants gradually until you hit your ideal shade. This is a vital phase, empowering you to dictate the overall style without accidentally obscuring the carved details.
Beyond just adding a tint, the acrylic resin serves a critical protective role: it enhances the surface sheen and seals the material. Since this specific sealant performs exceptionally well in both indoor and outdoor environments, it toughens the outer shell and shields your masonry from long-term degradation. To finish the composition, carefully trace the carved joints with a fine-tipped brush, tying the entire look together with seamless visual flow.
Ultimately, a surface that was once just an unrefined brick wall gains an incredibly premium aesthetic backed by heavy-duty protection. It is solid proof that standard building supplies can transcend their basic utility and become genuine architectural art. Be sure to save these instructions for your next major home improvement venture.