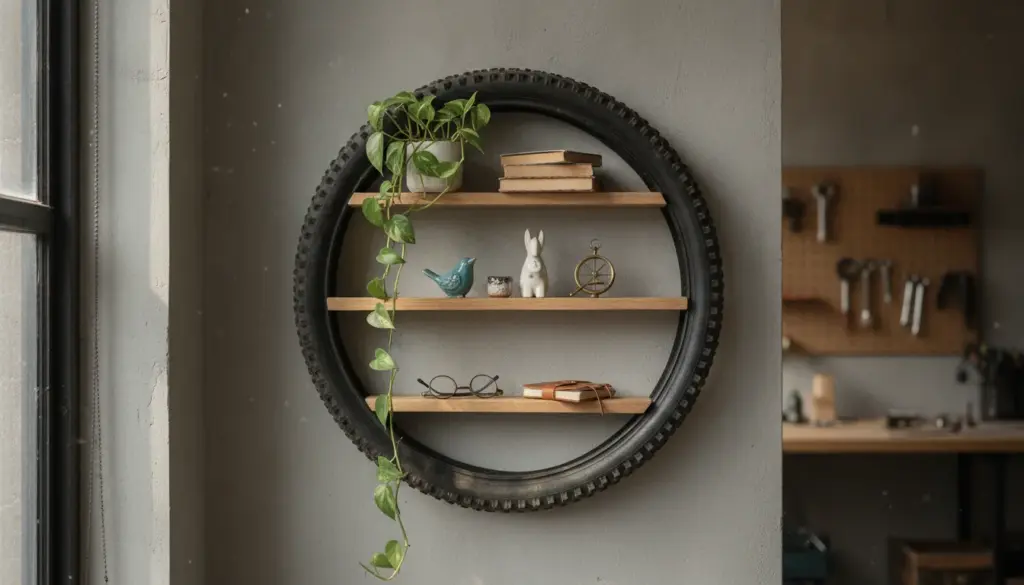
Instead of tossing out that recently replaced bike tread or the spare gathering dust in your garage, consider giving it a second life. Transforming a discarded tire into a stunning, circular floating shelf requires nothing more than a bit of patience and imagination.
This unique DIY project instantly injects a modern, industrial vibe into any living space. The unused rubber wheel casing serves as an eye-catching border, creating the perfect display area for trailing houseplants, small paperbacks, or your favorite trinkets.
Step-by-Step Guide to Crafting a Tire Shelf
You certainly do not need a professional background in carpentry or interior decorating to pull this off. To successfully upcycle your materials, simply gather a freshly washed tire, a few wooden planks, sturdy screws, and a dash of creativity.
Follow these simple steps to build your custom piece:
- Scrub the rubber thoroughly to eliminate all lingering mud, road dust, and stubborn chain grease.
- Calculate the inner diameter carefully, then trim your wooden boards so they wedge seamlessly inside the casing to act as shelves.
- Drive screws through the exterior tread directly into the wood, verifying that each tier is tightly secured and stable.
- Select heavy-duty wall hooks or mounting brackets to safely anchor the finished fixture to your wall.
- Apply a fresh coat of paint prior to installation if you want the piece to perfectly match your room’s specific color palette.
Once completed, you are left with a highly functional storage solution that beautifully doubles as a brilliant decorative focal point.
Crucial Safety and Construction Precautions
Before you even reach for your tools, take a moment to carefully inspect the structural integrity of your material. Should you discover severe dry rot, deep cracks, or significant damage, it is best to simply discard that particular tire and find a safer candidate.
Proper installation and assembly are essential for keeping your new decor secure over time. Keep these expert tips in mind:
- Start with a pristine surface by washing the exterior, immediately discarding any rubber that feels brittle or compromised.
- Fasten the wooden tiers securely utilizing either high-quality screws or an industrial-strength construction adhesive.
- Install robust drywall anchors and durable mounting hardware, keeping in mind that the completed assembly will likely weigh much more than you might anticipate.
- Avoid overloading the structure by exclusively placing lightweight decorative objects on the wooden slats.
- Use specialized paint formulated for rubber if you decide to alter the color, making sure to keep your workspace thoroughly ventilated during both application and the drying process.